Thinking about your Solar Tile Installation near Westmoreland County Pennsylvania?
Get clear on how panels, tiles and roofing fit into a single plan
Call 412-858-8858 and tell us about the house
A Solar Plan Begins on the Roof Deck: What Gets Checked First
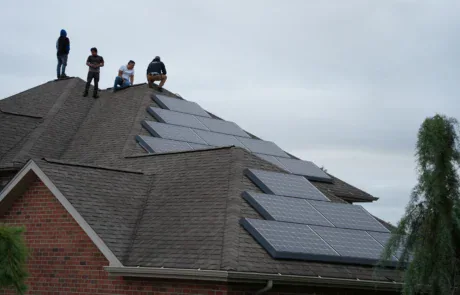
Solar Tile Installation begins with a hard look at the shingles, flashing and decking underneath; the decision between repair and replacement is made first, before layouts are drawn. Older houses with plank decking or thin rafters call for a closer look; the crew documents what it finds with photographs.
The flashing where the roof meets a chimney or a wall is checked for rust, gaps and old patching; the outcome is a plain answer to the question of whether the roof is ready. Collect any records of earlier repairs and share them with the roofer; the owner's knowledge of the house fills gaps no inspection can reach.
Every panel is only as dry as the roofing beneath it; a thorough roof walk takes less time than a repair under an array. Shingle life and panel life are rarely the same; replacing the roof first lines the two up so neither outlasts the other.
Where the Sunlight Actually Falls: Chimneys, Dormers and Neighbors
A roof facing south, east or west tends to see more useful sun than one facing north; photographs and measurements made on site beat a guess from a satellite picture. The Pittsburgh area has plenty of gray days, so honest expectations matter; trees that were small at planting have grown past the roofline.
Every slope gets its own check, since a house can have good and poor sections side by side; dormers and chimneys that look small on the ground cast long shadows.
The shape of the roof shapes the layout; each section is planned as its own small puzzle. Trees and hills are part of the plan; the plan accounts for shade that grows over the seasons.
Winter shows the true value of a good site plan; leaf-out in spring changes the picture for the roof within weeks.
Panels on Top or Tiles in the Roofline: What Each One Asks of the Roof
Most arrays are rack-mounted, with panels fastened on rails above the roofing; a rack system leaves the existing roofing in place and adds a layer above it. Electrical connections under the tiles need protection from water and from pests; a failed connection under the tiles is harder to reach than one on a rack.
Roof color and the color of the modules are matched for a quieter look when the design allows; flush products take more careful flashing at every edge.
Each style needs its own installation method and its own flashing details; the crew follows the maker's instructions for spacing, fasteners and overlaps. The roofer sets chalk lines, checks courses and keeps edges even; tile-style modules are walked on carefully and carried by hand.
Keeping Water Out Where the Mounts Go In: The Flashing Details
Rack systems are held to the roof by mounts that go through the shingles and into the framing; ice and snow press against every bracket through the winter. Wood shakes and older asphalt shingles may need extra care around each mount; the damage from a mismatch shows up over the seasons rather than on day one.
Preparation under the mounts is as careful as the work above them; water flows down the slope and has to be sent around every post and bracket.
A solar mount is a tiny roof repair waiting to be done well or badly; the right bracket for a slate roof is not the right bracket for shingles.
Gusts load a roof from every direction, and an array adds surface to catch them; the roofer reviews the edge details with the same care as the field. Water also runs behind and beneath the array; the surface under the array is checked at the same time as the rest of the roof.
Cold-Season Realities: Planning for Winter
Snow guards or placement choices can keep snow from sliding onto walkways, doors and gutters; the plan for a long, steep roof differs from the plan for a low shed. An ice-and-water barrier is worth having along the eaves and in the valleys; the roofer looks at the whole system, not only the part covered by panels.
Snow load is part of the structure's design, so the framing has to carry it; winter proves whether a solar plan was thought through.
Ice dams and solar arrays share a roof; the eaves need the same barrier and the same attention they always did.
Where the Electrical Work Begins and Ends: Dividing the Work
Roofers handle the roof surface, the flashing and the mounting hardware; the roofer who knows the wiring plan can protect each entry point. The two crews work in a sequence, and each depends on the other; the roof is sealed before the wiring is run, not after.
Labels and clear diagrams show the next person where each wire goes; a poorly sealed wire entry is a slow leak that nobody sees.
Planning the wire path is part of planning the roof; every opening in the roof gets flashing, and the opening is made only once.
Roof First, Solar Second: Timing the Two Projects
Sequence is the secret of a clean solar job; there is no need to pay twice to open the same part of the house. Sometimes the roof needs work after the array is up; the electrical side must be shut down before anyone touches the panels.
Planning a reroof and solar together uses one set of access and staging; a single schedule keeps everyone moving in the right order.
The roofing materials and mount locations should be written down for whoever works on the roof later; a loose bracket or a lifted flashing is caught early with a regular look.
Timing a reroof and a solar project can save a season; the weather windows in the region are limited, so planning matters.
Checkups After the Array Goes On: What to Watch
Keep a photo of the roof from each side so changes are easy to spot over time; shingles around the array edge deserve a look because wind lifts them first. A soft brush or a gentle rinse from the ground keeps panels clear without scraping the glass; moss grows faster on a shaded roof and spreads under the lower edge of panels.
Questions About Solar Are Welcome: Share What You See
The crew at The Roofing Company is happy to explain the roof side of solar in plain words; reach out at 412-858-8858 and describe the roof. Describe the house, the roof and your questions, and a roofer will take it from there; a plan made early keeps surprises off the roof.
Verified

Verified
Verified